Brainstorm in Bloom

Where Mommas and Kiddos stay happy one Project at a time!

Showing posts with label Spring. Show all posts

Saturday, March 30, 2013

Egg Carton Bird Nests (Single Stem Idea)


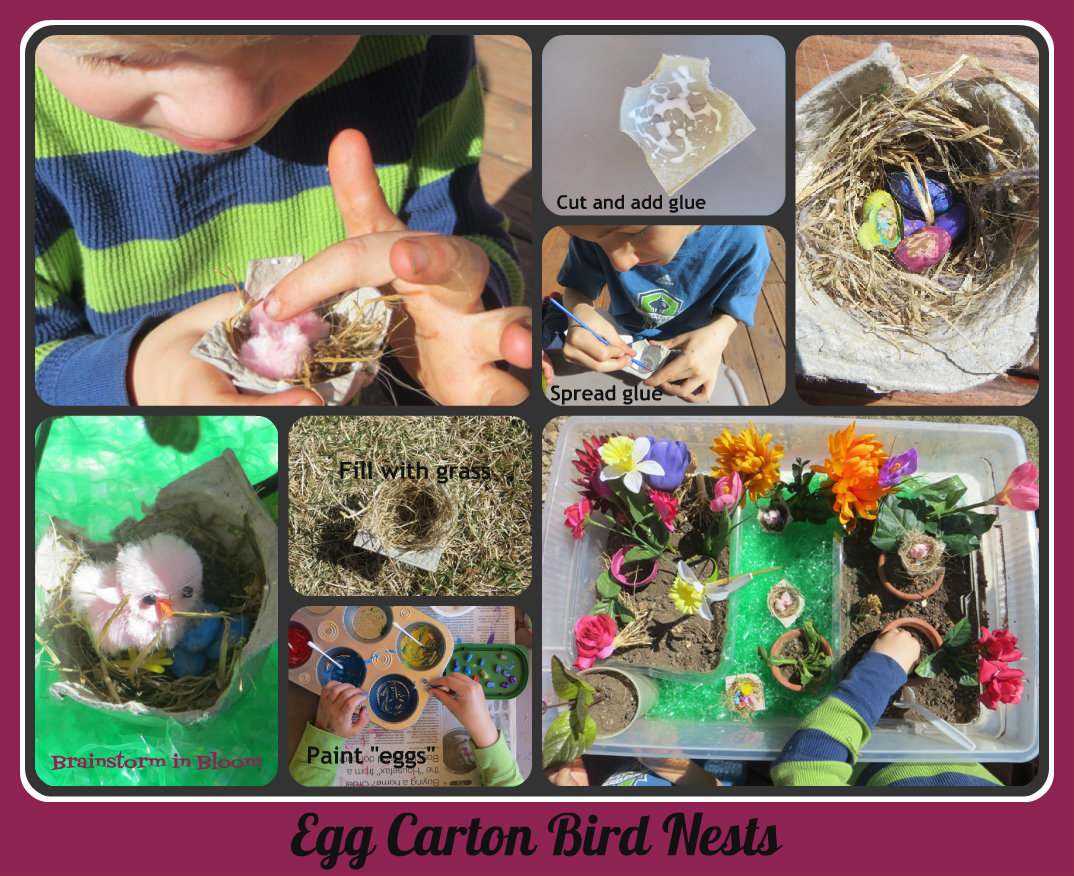
The boys and I made these cute bird nests this morning. I was working on a Spring Bin and thought we needed something to represent all of the new birds we are seeing! This idea is simple ~ you probably have everything you need (except maybe little birdies but it could just be a nest of eggs). 

Enjoy this single stem idea of Egg Carton Bird Nests for
Sprouts and Seedlings (toddler/preschool and elementary age)...

The Stuff
The FUN!
Egg carton (cardboard preferably)
Glue
Dry grass
Dry beans
Paint (brushes or q-tips)
Little birdies (optional – I got ours on clearance last year at Michaels)

1. Cut egg carton apart so you have individual egg holders. I had to trim the middle piece a little too.

2. Kiddos put glue on the inside. They can either paint glue on or just squeeze it in there.

3. Kiddos scrape up some dry grass from the yard and add it on top of the glue. If the grass is green just pull some up and it will dry out in several days.

4. Paint dry beans. We dropped the beans in our muffin tin with paint and swirled them around with a q-tip. Then we set them out to dry.

5. When the beans are dry add them on top of the grass and then add a birdie if you want!

These look cute on top of the dirt in a flower pot or you can make a Spring Sensory Bin and add them!

Here is the Spring Bin ~ dirt in old spinach tubs, Easter grass, flower pots, fake flowers, plastic bugs, spoons to scoop, old corn roots, and our Egg Carton Bird Nests!


More ideas…
Please BRAINSTORM your ideas/suggestions in the COMMENTS below for the Egg Carton Bird Nests!
Happy Easter
~Sara


Thursday, March 14, 2013

Rainbow Raindrops (Single Stem Idea)


So with our St. Patty’s Day Rainbow themed party coming up next week I have had rainbows on my mind! As I was running downstairs to grab something I spotted a box of macaroni noodles in the pantry and of course they didn’t look like macaroni at all but instead like mini-rainbows! So, I snagged them and then Hornet and I got right to work with dying them the colors of the rainbow (the little two were napping). Check out what we did (this was fun for all of the ages of the boys~ 3,4,6 and myself)
Enjoy this single stem idea of Rainbow Raindrops for
All ages…
The Stuff
The FUN!
  Macaroni noodles
  Vinegar
Food color
Plastic tub (I used a empty plastic spinach tub before it went in recycle)
Paper
Glue
Cotton balls
1. Dye the noodles by putting 1 teaspoon (or more if larger group) of vinegar and a few drops of food color in a plastic tub (you can also use ziplock bags). Add a handful (or more if with large group) to the tub and put the lid on. Let the kids shake it up until the noodles are dyed. Put on a plate or cookie sheet to dry. Do the same with the next color of the rainbow.

2. Kiddos glue on clouds (cotton balls) at the top of their paper.

3. Kiddos then put dots of glue underneath the clouds and then add their rainbow raindrops! We talked about putting them the way of the rainbow but that kinda was forgotten by Roly Poly and Firefly.  

*I encourage you to do one of these as well with your kiddos as they won’t need much help and it is simple and fun!
  
Doesn't that just look cool :)
This is a great book to go along with making Rainbow Raindrops!

Here is how they all turned out!

Please BRAINSTORM your ideas/suggestions in the COMMENTS below for the Rainbow Raindrops!
Happy Crafting
~Sara
Related Posts Plugin for WordPress, Blogger...
Pin It button on image hover