Brainstorm in Bloom

Where Mommas and Kiddos stay happy one Project at a time!

Showing posts with label Winter. Show all posts

Saturday, February 9, 2013

Conversation Hearts Vase (Single Stem Idea)


This cute and simple vase is filled with conversation hearts for Valentine’s Day. One of the great things about this is that it can cost under 2 bucks to make! There are similar vases on Pinterest that have a glass inside the vase instead of the paper tube so that they can hold flowers but I think this looks great with just the hearts. You can also replace the hearts with jelly beans for Easter! This idea is from my wonderful friend Traci (crafty mom of four boys) – she submitted it for the January CSA of Wrapping Paper Tubes but I thought it needed a post of its own!  

Enjoy this single stem idea of Conversation Hearts Vase for
any age…
The Stuff
The FUN!
Paper towel/wrapping paper/TP tube
Glass vase (got ours at the dollar store)
Candy hearts

1. Gather supplies.

2. Put roll in vase. You may have to cut down the tube to the size you want.

3. Fill making sure the tube stays in the middle. Fill to the top of the tube.

Display!


More ideas…

Please BRAINSTORM your ideas/suggestions in the COMMENTS below for the Conversation Hearts Vase!
Happy Crafting
~Sara

Tuesday, January 29, 2013

Snowman Playgroup Party (Bouquet Event)


We are in great need of snow so we thought it was appropriate to have a snowman party - we actually got snow (we knew it was an inch thanks to our new Snowman Measuring Sticks) the day after the party! Our preschool playgroup had a lot of fun reading snowman books, singing Frosty the Snowman, having Snowman circle time, doing a couple snowman crafts, having a snowman snack and playing with tubs of sensory snow! Is that enough snowman for you? We had fun and many of our activities would be great for older ages too!
Check out the ideas for a

Snowman Playgroup Event for
Sprouts and Seedlings (toddler/preschool and elementary age)...

Snowman Circle Time
A few moms helped out with circle time this week – books, songs, and snowman learning!
The Stuff
The FUN!
Snowmen at Night by Caralyn Buehner

Snowballs by Lois Ehlert

Frosty the Snowman lyrics (if you don’t know them by heart)

White foam circles with Velcro where eyes, nose, mouth, buttons, gloves, boots and hat go

Felt pieces for the eyes, nose, mouth, buttons, gloves, boots and hat

Blue and white cotton or fluff balls

Giant paper snowball
1. Read Snowmen at Night and have a good giggle!

2. Sing Frosty the Snowman! Have the kids pat the rhythm on their legs and practice the song in small sections. Then the kids can march and clap the rhythm as they sing!

3. Build a snowman with white foam circles. Then the kids each add felt pieces for the eyes, nose, mouth, buttons, gloves, boots and hat.

4. Make and discuss patterns using blue and white “snowballs” cotton/fluff balls

5. Pass around a giant paper snowball. Teacher says pass it to someone wearing jeans, a blue shirt, a boy, etc.

6. Read Snowballs by Lois Ehlert and discuss crafts.


Textured Snowman
After reading Snowballs by Lois Ehlert you won’t be able to resist making a textured snowman – it is like the book is begging for you to do a craft!
The Stuff
The FUN!
Snowballs by Lois Ehlert

White paper (you can either let the kids trace circles and cut them out or pre-cut)

Blue paper

Items for texture (corn, beans, popcorn, rice, leaves, sequins, beads, twigs, buttons, etc.)

Fabric, ribbon for scarf or hat

Glue
1. Read Snowballs by Lois Ehlert before doing this craft.

2. Cut circles if not pre-cut and glue them onto blue paper to make snowman body.

3. Glue items down for texture. Kids can make faces, legs, arms, snow, or just add items over the circles – whatever they want! They can add a hat or scarf.

Let dry and display!


Snowman Measuring Stick
This idea is from Pink and Green Mama - a fabulous blog you must check out - you can find directions for the measuring sticks by clicking on her link! Paint stir sticks are turned in to snowmen and then used as rulers to measure the snow or anything else that might need measuring (like Roly Poly’s alligator, Swampy - as seen in pic at bottom)!
 
Snowman Pancakes and Hot Chocolate SNACK
The Stuff
The FUN!
Pancake mix

Berries, raisins, oranges, chocolate chips, etc. to decorate snow-pancake

Syrup, peanut butter

Hot chocolate w/ marshmallows (we had snowman mallows!)
1. Cook a bunch of small circle pancakes and make hot chocolate.

2. Kids create a snowman pancake!

Gobble up the pancakes and drink the hot chocolate!

Sensory Snow
Check out my post on "Comparing Sensory Snow Tubs" to see all of the different types of snow we have made recently. The kids had a great time exploring the different types of “snow”!

Check out these cool types of "SNOW"


More ideas…
Measuring Swampy with our new ruler!
Another great book! This one explains how snow crystals and snowflakes are formed!

Please BRAINSTORM your ideas/suggestions in the COMMENTS below for the Snowman Playgroup Event!
Happy Crafting
~Sara
Thursday, January 10, 2013

Cardboard Snowmen Prints and Thank You Notes (Singe Stem Idea)


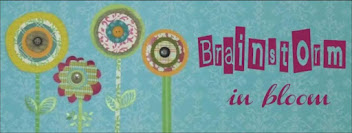
Using corrugated cardboard has become one of my favorite ways to make prints. We first did it for our Summer Craft Kits in 2011 when we made 4th of July shirts with Star Prints(pic is at bottom of post). I like using the cardboard because it is easy and looks unique. For the Cardboard Box Up-cycled we made Snowmen Prints which turned out quite cool as shown below. The idea for the Snowmen Thank You Notes occurred to me as the white painted circles for the Snowmen Prints were drying (I was planning to use them again with color for pattern practice). One look at them and I knew they just had to be made into snowmen as well. I tore off the lids from the backs that they used to stamp with and cut them smaller though so they could fit on a paper folded in half. The boys had fun turning making them into snowmen!

Enjoy this single stem idea of
Cardboard Snowman Prints and Thank You Notes for
Sprouts and Seedlings (toddler/preschool and elementary age)...

Cardboard Snowman Prints

The Stuff
The FUN!
Cardboard
Scissors
Glue
Small plastic lids (or corks)
White Paint and brush
Markers (or paints)
Scraps of paper

1. Cut out cardboard circles (I traced various sized lids). Peel a layer of cardboard off to expose corrugation (I use a pencil to slide along each corrugated ridge. Slightly wet the corrugation to get rid of the shaggy ridges. Glue on lid to smooth side so kids can hold while stamping. Let dry.

2. Once lid is dry, paint ridges white. Stamp paper with three circles for snowmen.

3. Use markers, paint or paper scraps to decorate snowman.

Display!

Cardboard Snowman Thank You Notes

The Stuff
The FUN!
White painted cardboard circles from Snowman Prints
Colored paper (we used blue cardstock)
Envelope (we used left over Christmas pic envelopes)
Markers (or paints)
Scraps of paper (we used foam pieces)
Glue

1. Tear off lids from Snowmen Prints carefully.

2. Glue circles down on a piece of folded paper for a card.

3. Use markers, paint or paper scraps to decorate snowman.

4. Write thank you note and send!

More ideas…
Our first time with corrugated cardboard was...4th of July Star Shirts - idea from Spoonful but we did ours on red shirts which I thought made the stars stand out more!
Please BRAINSTORM your ideas/suggestions in the COMMENTS below for the Cardboard Snowman Prints and Thank You Notes!
Happy Crafting
~Sara
Related Posts Plugin for WordPress, Blogger...
Pin It button on image hover