Woohoo ~ I am
happy to post the first
CSA (Community Supported Activities/Crafts/Organization)!
Each month a handful of awesome friends and I are going to use a household supply item (that might otherwise be tossed) and find a way to upcycle it! You can join in on the fun – November 2012 is a glass jar and December 2012 will be a wrapping paper tube so start thinking and creating! There will be a random winner each month!
This month was to upcycle a tissue (kleenex box). I was truly impressed by what some of the crafters came up with! I hope you get some fresh ideas and enjoy this post of…
TISSUE (Kleenex) BOX
Community Supported Activities/Crafts/Organization
for All Ages!
MADE by, Angelina and her near 4 year old
The Stuff
|
The FUN!
|
|
Create
the Bot Box!
I helped with putting the eyes on and cutting some of the foam. 3 year old was able to cut some of it, but she put most of it on (I helped with a few pieces), peeling off the backing and all. We both had fun with the glitter glue, and she did all the painting. I helped poke the holes in the bottom of the box for the sticks to put the "wheels" on, and secured them on. We just used our imagination! |
From "Bless you" to
"blessings"
MADE by, Maya (eighth grade crafter and good kid) Charli (creative kindergartner and future dancer) and and Melodie (part time teacher and wannabe rock star)
MADE by, Maya (eighth grade crafter and good kid) Charli (creative kindergartner and future dancer) and and Melodie (part time teacher and wannabe rock star)
The Stuff
|
The FUN!
|
|
1.
We took our empty tissue box which is used when
we say "bless you". We painted it orange and yellow with tempera
paint. Let dry.
2.
Next use mod podge to cover it with fall leaves.
3.
We plan to each write a blessing or something we
are thankful for on slips of paper each day in November and read them out
loud on Thanksgiving day.
|
MADE by, Katie
The Stuff
|
The FUN!
|
|
Create the calendar by:
Holder is small kleenex box Cards for months, weeks, and days are side pieces of small kleenex box Season that goes on the top is the top of the small kleenex box Sections are divided by rolled up tissue that has been taped. |
MADE by, Gretchen and her 5-year old!
MADE by, Gretchen and her Ninja
The Stuff
|
The FUN!
|
|
1.
Cut red papers lengthwise the size of
your kleenex box. Tape on to cover side of box. With leftover red, cut out ½”
circle for later step.
2.
Cut out 2 small Chinese dragons and
paste on middle sides of front. (I cut one larger one in half but made them
thinner for this project)
3.
Cut out a 4” oval out of white paper
to paste in center of 2 dragons.
4.
With black card stock, cut out a
rendition of a three-tiered Chinese castle roof, starting with the lowest one
the size of your Kleenex box. I made little triangular points at each corner
to glue “fire” to.
5.
Cut out 4 yellow fire sticks to paste
on each corner of roof. Cut out a thin yellow strip for top of bottom tier of
roof. Glue red circle, cut out in step 1, to middle of top tier.
6.
Glue 3-4 ¼ popsicle sticks in a
downward row below the oval to look like stairs. Use 2 of the remaining
popsicle sticks on each side to look like the castle is on stilts.
7.
Store Ninjago Spinners and cards in
it!
|
They are kind of petite for
trick-or-treating candy, but if you are trying to cut back maybe you can just
quit when they are full! :)
MADE by, Laura and her boys!
MADE by, Laura and her boys!
The Stuff
|
The FUN!
|
For Decoupage Box:
For Duct Tape Box:
|
Decoupage Trick-or-treat Box
1.
Mix glue with food coloring or paint
color of choice (I also added a little water to make it thinner).
2.
Tear strips of newspaper and then
layer them around the box, painting them on with the colored glue. Cover the
top as well, but leave the hole open. Allow to dry overnight.
3.
I did this one with my 5 year old, so
after it was dry I gave him a black permanent marker to draw on a
jack-o-lantern face.
4.
Next, poke holes in two sides of
the box to attach the handle. (I used a wooden shish kabob skewer.)
5.
Thread a ribbon through one hole and
tie a knot on the inside end so that it won't pull back through the
hole. Thread the other end through the hole on the other side and tie
another knot on the inside end.
Duct Tape Trick-or-treat Box
1.
Layer duct tape (in color of choice)
around the kleenex box, covering the top except for the hole.
2.
I made this one with my 3 year old,
so I had him tell me the shapes he wanted for his jack-o-lantern's eyes,
nose, and mouth. I cut them out of black paper and then he glued them
on to make the face.
3.
Next, poke holes in two sides of
the box to attach the handle. (I used a wooden shish kabob skewer.)
4.
Thread a ribbon through one hole and
tie a knot on the inside end so that it won't pull back through the
hole. Thread the other end through the hole on the other side and tie
another knot on the inside end.
|
Can be used with many subjects/topics for
learning
MADE by, Sara, Hornet and Roly Poly!
MADE by, Sara, Hornet and Roly Poly!
The Stuff
|
The FUN!
|
|
1.
Modge podge colored paper over the box. *we also
plan to add sea creature pictures
2.
Make fishing pole by gluing yarn to one end of
dowel and other end to small magnet.
3.
Make “fish” by writing words, math problems,
sounds, … on small pieces of paper. Add paper clip to each paper.
4.
Go fishing! Fish for a paper by putting magnet
in the box and pulling out a paper. Read it, add it, sound it out,… Have fun!
|
More ideas…
We made these tissue box Vases at my Garden Event
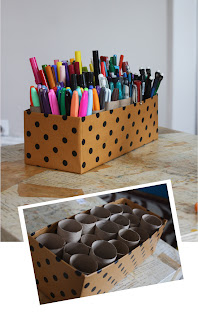
Check out this Marker Caddy that Aunt Peaches made from
a shoe box - would be cute with
a Tissue Box as well!
a shoe box - would be cute with
a Tissue Box as well!
 |
Like these Upcycled Kleenex Box Gift Tagsfrom Cute and Useful! |
Check out my Pinterest Board
for more Tissue Box Ideas!
Please BRAINSTORM your
ideas/suggestions in the COMMENTS below for the TISSUE (Kleenex) BOX Upcycled CSA!
Happy Crafting
~Sara
Happy Crafting
~Sara


Awesome ideas Sar Bear and friends!
ReplyDeleteLove this! Great idea, Sar!
ReplyDeleteKatie was our first winner that contributed to the brainstorm for tissue boxes! Winners picked randomly. She won a $20 gift card to Target (who doesn't love Target)! Congrats Katie!
ReplyDeleteI'm excited to see what everyone dreams up for the glass jar next month!